Operate a robot arm (Rasberry Pi)
Preparations are necessary to play the lab “1. Operate a robot arm.”
1 What you need
- Personal Computer (Windows or Mac)
- Raspberry Pi 4 Model B (No limitation to the memory capacity. Either OKdo or Element14 can be used.)
- Sun Founder Raspberry Pi Robot Arm Kit (SKU:CN0311D)
- microSD card (8GB or more)
- SD card reader (Not required if your computer has a SD slot.)
- Two 18650 Lithium-ion batteries (With protection circuit)
- Although Sun Founder recommends lithium-ion batteries without protection circuits, we recommend using those with protection circuits because the former may catch fire if mishandled. Please note the size of the battery increases due to the protection circuit, which may make it difficult to insert the battery into the battery box.
- 18650 Lithium-ion battery charger
- Local Area Network and Internet access (Wi-Fi or LAN cable connection)
2 Write Raspberry Pi OS image to the microSD card
Write an OS image to the microSD by referring to the Sun Founder’s documentation.
- Supplementary note
- STEP 4
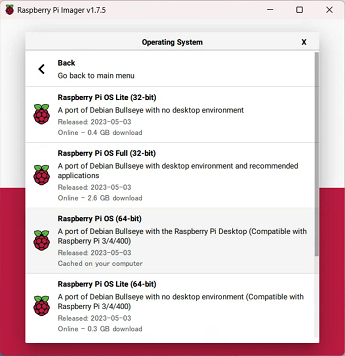
- Sun Founder recommends using the “Debian Buster” version, but we use “Debian Bullseye” because of errors that occur during setup.
> Raspberry Pi OS (64-bit)
> A port of Debian Bullseye with the Raspberry Pi Desktop (Compatible with Raspberry Pi 3/4/400)
> Released: 2023-05-03
- Sun Founder recommends using the “Debian Buster” version, but we use “Debian Bullseye” because of errors that occur during setup.
- STEP 6
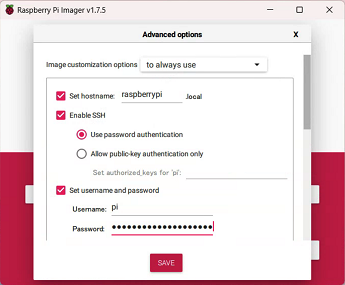
- hostname: raspberrypi
- Username: pi
- Password: any (You use it later.)
- Wi-Fi setup is not required when connecting to a network using a LAN cable.
- STEP 4
3 Assemble a Robot Arm Kit halfway
Referring to the YouTube video, assemble a Robot Arm Kit to the point where the Raspberry Pi and Robot HAT board (white one) are connected. (up to about 02:40 in the video)
- Stop assembling at this point and install the necessary modules on the Raspberry Pi. (If you assemble it all the way to the end, you may have to disassemble it to adjust the motors.)
4 Remotely access Raspberry Pi from your computer
- Insert the microSD card to the slot on the Raspberry Pi.
- Turn on the Robot HAT board and start the Raspberry Pi.
- It takes a little while for the Raspberry Pi to start.
- It takes a little while for the Raspberry Pi to start.
- Connect the Raspberry Pi to the same local area network to which your computer is connected.
- If connecting them over a LAN cable, plug it into the Raspberry Pi.
- If connecting them over Wi-Fi, do nothing.
- Remotely access Raspberry Pi from your computer via SSH.
- Open the command prompt (“Power Shell” for Windows or “Terminal” for mac).
- Excecute the SSH command below.
> ssh pi@raspberrypi.local - Enter “yes” when the following message is displayed. (Only the first time)
> The authenticity of host ‘raspberrypi.local (fe80::8efa:432f:f776:dcf1%10)’ can’t be established.
> ED25519 key fingerprint is SHA256:3Lw04A+Ox+jzsoyKOu3E1hse8vSYtBGpBVAxULcBxCE.
> This key is not known by any other names
> Are you sure you want to continue connecting (yes/no/[fingerprint])? yes - Next, enter the password you set in the Raspberry Pi Imager.
> pi@raspberrypi.local’s password: - The connection is successful when the following message is displayed.
> pi@raspberrypi:~ $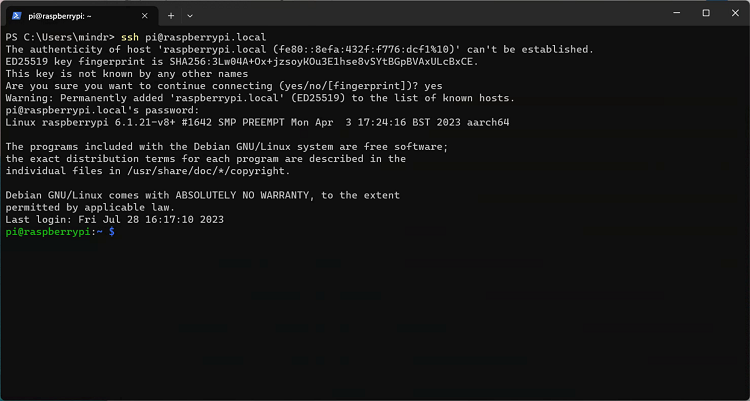
- To disconnect from SSH connection, execute the “exit” command.
> exit - If you get the error “WARNING: REMOTE HOST IDENTIFICATION HAS CHANGED!”, execute the following command.
> ssh-keygen -R raspberrypi.local
- Open the command prompt (“Power Shell” for Windows or “Terminal” for mac).
5 Install the necessary modules on the Raspberry Pi
- Open the command prompt and execute the SSH command.
> ssh pi@raspberrypi.local
> pi@raspberrypi.local’s password: - Install the modules. Follow the instructions here.
- Run i2samp.sh after rebooting the Raspberry Pi. Otherwise it will not work properly.
6 Calibrate the servo motors
- Open the command prompt and execute the SSH command.
> ssh pi@raspberrypi.local
> pi@raspberrypi.local’s password: - Calibrate the servo motors. Follow the instructions here.
- Because servo_zeroing.py of Robot Arm Kit has a bug and you cannot calibrate the motors, You need to replace it with servo_zeroing.py of PiCar-X.
- You can rewrite servo_zeroing.py using the nano editor on your Raspberry Pi.
> cd /home/pi/piarm/examples
> sudo nano servo_zeroing.py - Replace it with the following code.
——–
from robot_hat import PWM, Servo
from robot_hat.utils import reset_mcu
from time import sleep
reset_mcu()
sleep(0.2)
if __name__ == ‘__main__‘:
P_11 = Servo(PWM(‘P11’))
P_11.angle(0)
——– - Press “Ctrl+X” and then “Y” to save the file and exit the nano editor.
7 Assemble a Robot Arm Kit to the end
Refer to the included instructions and YouTube video to assemble it all the way to the end.
8 Transfer a Python program for Mind Render to the Raspberry Pi
- Download the zip file “mrarm.zip” from the button below.
- Extract the downloaded zip file.
- Open the command prompt.
- Go to the location where the expanded folder is located.
- For example, if you have the folder on your desktop,
> cd ~/Desktop
- For example, if you have the folder on your desktop,
- Execute the SCP command.
> scp -r mrarm pi@raspberrypi.local:~/mind-render/
Enter your password.
> pi@raspberrypi.local’s password: - Execute the SSH command.
> ssh pi@raspberrypi.local
> pi@raspberrypi.local’s password: - Execute setup.sh.
> cd ~/mind-render/mrarm
> sh ./setup.sh
9 Run the Python program for Mind Render
- Open the command prompt and execute the SSH command.
> ssh pi@raspberrypi.local
> pi@raspberrypi.local’s password: - Run the program.
> cd ~/mind-render/mrarm
> sudo python3 main.py - To stop the program, press “Ctrl+C”.
10 Start Mind Render and run the lab program
Start Mind Render and run the lab program.(iPhone/Android smartphone or tablet, Windows, or Mac)
- Navigate to Create (or Lab) > Connect with external > Raspberry Pi > 1. Operate a robot arm and click the “Start” button.
- Click the green “Raspberry Pi” image on the scene edit screen.
- Connect Mind Render and the Raspberry Pi on the Bluetooth connection screen that appears.
(Select “Raspberry MR Arm” or “raspberrypi”) - Close the connection screen.
- Close the connection screen.
- Press the Run button to execute the program.
*Raspberry Pi is a trademark of Raspberry Pi Ltd.
*Other product names and company names mentioned herein are generally trademarks or registered trademarks of their respective companies.